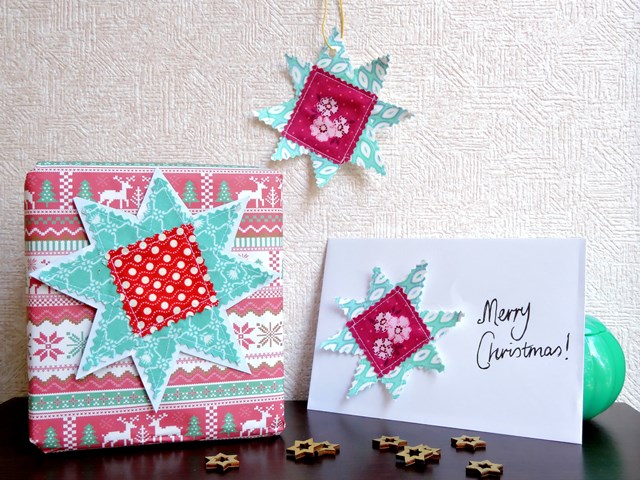
I’ve been experimenting with creating Christmas cards using scrap fabric, and one of the methods I tried yielded something different altogether to use for Christmas - star fabric gift tags! A quick and simple way to add a handmade touch to your presents this year. You could even use them as decorations or ornaments if you use fabric you truly love and can’t bear to part with!
What you’ll need
Selection of fabric scraps:
1 - centre square, at least 2″ square
2 - star points, at least 2.5″ square
Standard printer paper, or kraft paper, or card - at least 5″ square
Glue stick
Hole punch
Ribbon or twine
Pinking shears - optional, but will prevent fraying and thus loose threads shedding everywhere
ONE. Using your normal quilting ruler, draw a square on your paper, somewhere between 1.5″ - 2″. The larger the square, the larger the tag. Just make sure it’s smaller than your centre square fabric.
TWO. For your star points, cut your squares in half on the diagonal twice to create four small triangles. Use a little dab of glue on the back of the fabric, and stick it in place around the drawn square to create star points. Place them so that the inner edge is slightly inside the drawn line. They do not need to be straight, or perfectly square. Wonky is part of the charm!
THREE. Use pinking shears to cut around the centre square. Use a little dab of glue on the back of the fabric, and stick it in place covering up the drawn square and the inner edges of the star points.
FOUR. Using a normal stitch length, or even slightly longer if you prefer the look, sew around the inner edge of the centre square. Then sew around the inner edge of the star points.
FIVE. Carefully trim around the outer edge of the star with the pinking shears.
SIX. Punch a hole in one star point, and thread your ribbon or twine through. Knot it to create a loop, and you’re done! Or if you can’t bear to put a hole in it, just tape it on.
Optional - You may like to cover up the back of the gift tag with some plain card to cover the stitching. You could do so before the final trim with pinking shears in step five, or afterwards to create a border around the outer edge!
This is also a great craft idea to make with your kids as it’s fun to choose your fabric combinations, easy to draw the square and glue, and it really doesn’t matter if the sewing is a little wonky as long as they stay within the fabric!
If you’re looking for more Christmas related projects and tutorial be sure to sign up to our 30 Days of Christmas series where you will receive a Christmas project in your inbox every day in November!

You can also find more tutorials being added to November Noel over this month:
Living in Japan, Alyce spends her days mothering 2 little monkeys, quilting, blogging at Blossom Heart Quilts, and revelling in the fabrics of Japan!


 Crochet Along: Let's Start!
 DIY: Sewing Machine Extension Table
 Crochet Along: How to Change Colours

Leave a Comment